Salesforce Marketing Cloud messaging
Note
This app replaces an older version called Salesforce Marketing Cloud. The main improvement is that this version supports KakaoChinguTalk and WhatsApp. It lets you send messages with text, images, and buttons.
Overview
This integration between Salesforce Marketing Cloud and Infobip lets you use SMS, WhatsApp, Viber, and Kakao ChinguTalk in your customer journeys.
What You Will Need
- An Infobip account. If you do not have an account, you can create one.
- An API key from Infobip
- A Salesforce Marketing Cloud account with "admin" permission
- A KakaoTalk account
- Message senders for the channels you want to use
This integration requires proficiency with the Salesforce Marketing Cloud platform, specifically with the Journey Builder functionality.
How to Obtain Senders
SMS
- Login to Infobip. If you do not have an Infobip account, you can create one for free.
- In the left menu, click Channels and Numbers.
- Click the Numbers tile. Next you will see a page that displays all the numbers you own and that lets you buy a new number.
Viber
- Login to Infobip. If you do not have an Infobip account, you can create one for free.
- In the left menu, click Channels and Numbers.
- Click the Viber tile.
- Look for Send Viber registration request to our team and click the Send Request button.
- Login to Infobip. If you do not have an Infobip account, you can create one for free.
- In the left menu, click Channels and Numbers.
- Click the WhatsApp tile.
- Look for Send WhatsApp approval request to our team and click the Send Request button.
KakaoTalk
To purchase a KakaoChinguTalk channel you need to work directly with KakaoTalk. For information about how to do this, see our documentation.
Installation & Setup
Install the package
- Log into your Salesforce Marketing Cloud account.
- From the home page, navigate to Platform > Package Manager.
- Click the Deployment tab and then click Upload from File.
- Select the package file shared by Infobip and click Upload.
- Click Next and then click Deploy.
Once the package is deployed, the data extensions listed below are configured automatically. Their purpose is to allow message data, such as delivery reports, to be sent from Infobip to your Salesforce Marketing Cloud instance. This in turn allows your system to take action based on the data. For example, if an SMS delivery report indicates that a message fails, then your system can use that status information to retry sending the message.
- Default data extension JourneyData that can be used for Journeys
- Data Extension for SMS delivery reports
- Data Extension for SMS URL Clicks
- Data Extension for OMNI reports (for Viber and Kakao)
- Attribute group Infobip Messaging
Setup for custom message activity
Create webhooks in Salesforce Marketing Cloud
To make use of the data extensions, you need to create a Webhook Code Resource for the channels you want to use. You need to create a separate channel for SMS and a channel for Viber and KakaoTalk.
Here are the basic steps:
- Log into Salesforce Marketing Cloud.
- Create and give a name to a new collection.
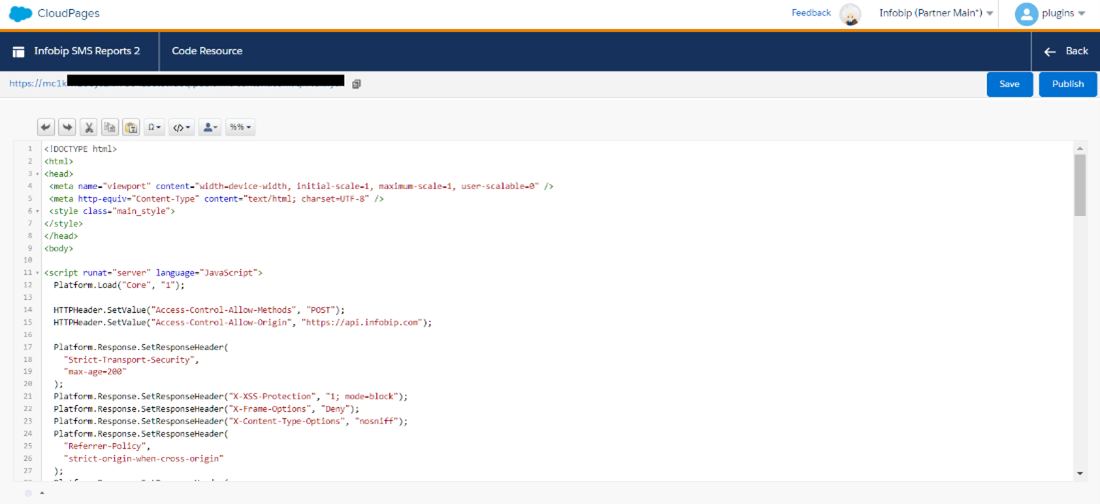
- Click Add Content > Code Resource.
- For Type select JSON and then click Save. This will create the webhook code resource. See example below.
- Copy and paste the code resource.
- Click Save and Publish.
Important
The webhook URL that is generated for either WhatsApp, Viber or KakaoTalk needs to be shared with Infobip in order to configure end endpoint for receiving delivery reports. The basic authorization code needs to be updated using the username and password.
To configure OMNI reports for Viber and KakaoTalk, send an email to support@infobip.com with the webhook URLs and basic authorization credentials.
Journey Builder Configuration
If you intend to use the data extentions that are installed with the app, then there are two tasks to do in Journey Builder:
- Define the message data to collect for SMS messages. Note that this requires entering a URL for the message notification endpoint. You need to contact your Infobip account manager for this URL.
- Create data extensions with custom fields. You will do this only if you want to have multiple data extensions for specific journeys and audiences.
Define custom message data
- Log into Salesforce Marketing Cloud and from the home page go to Setup.
- Click Apps > Installed Packages.
- Click New and then Enter package details.
- Click Save.
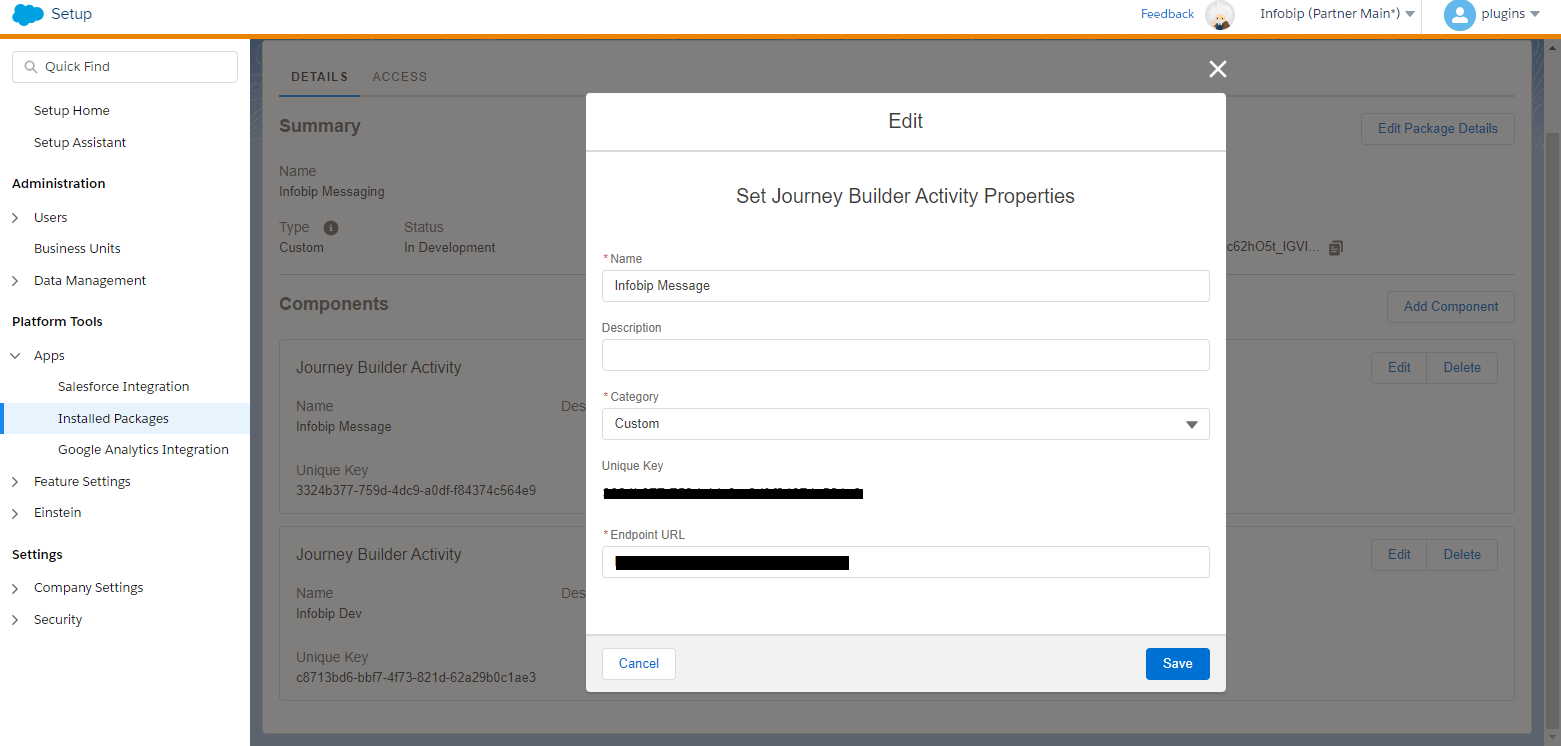
- Click Add Component.
- Select Journey Builder Activity and click Next. The Add Component pop-up displays.
- For Endpoint URL enter the URL provided to you by your Infobip account manager.
- Click Save.
Journey audience
If you want to have multiple data extensions for different purposes or different journeys, then clone the data extension that was created during installation and add customer fields needed for your purposes.
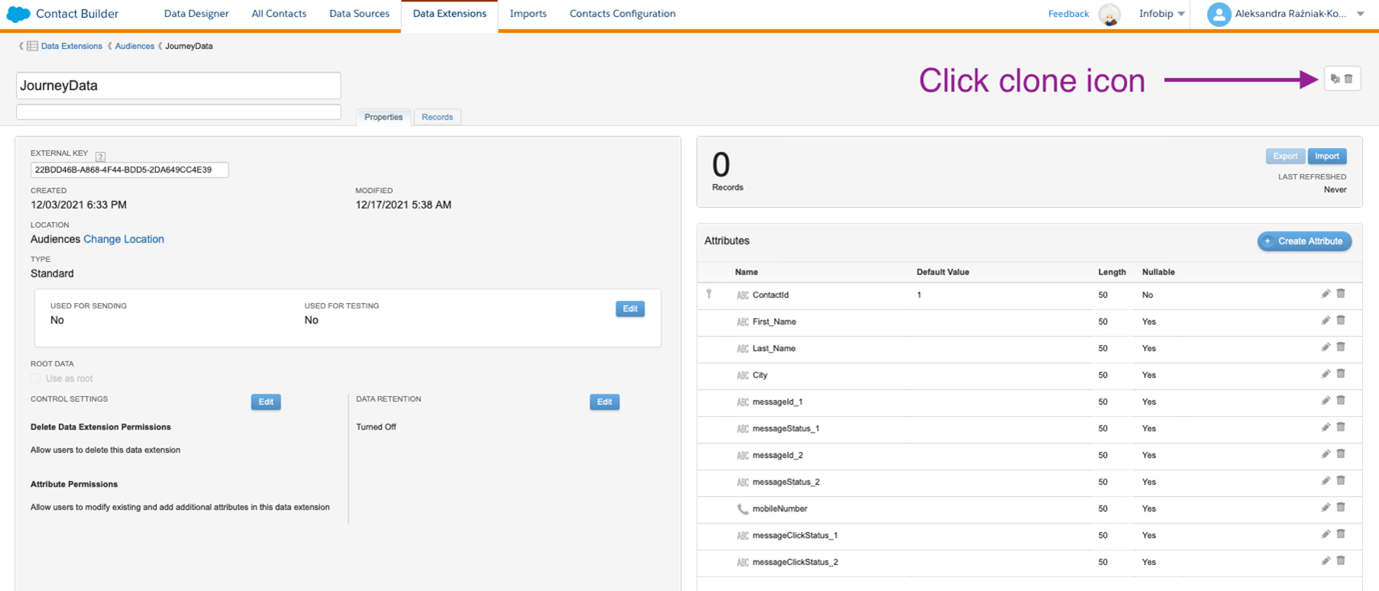
- Log into Salesforce Marketing Cloud and navigate to Audience Builder > Contact Builder > Data Extensions, and then to the Audiences folder.
- Locate the data extension called JourneyData.
- Clone the data extension. This will be your Audience storage. Note that the phone number should be mandatory and type should be phone.
- Give the data extension a name and click Save.
One the left side of the screen under Type, click Edit to define the data extension behavior. Check Used for Sending and map ContactId to relate to Subscriber key. Click Save.
Your data extenstion is now ready for use in Journey Builder. The next step is to map the Journey data extension to system data and message reports.
- Navigate to Contact Builder and then Data Designer.
- Locate the Infobip Messaging attribute group and click it. This attribute group should already have a Journey data extension mapped to system data and message reports data extension, but you can add more Journey audience data extensions as you need.
- In the top, right corner, click the drop-down element next to the Data Extension button and click the link.
- Select the data extension you want to use in the journey and use ContactId as a key for matching the records.
- Save the setup.
Connect a journey audience with message reports
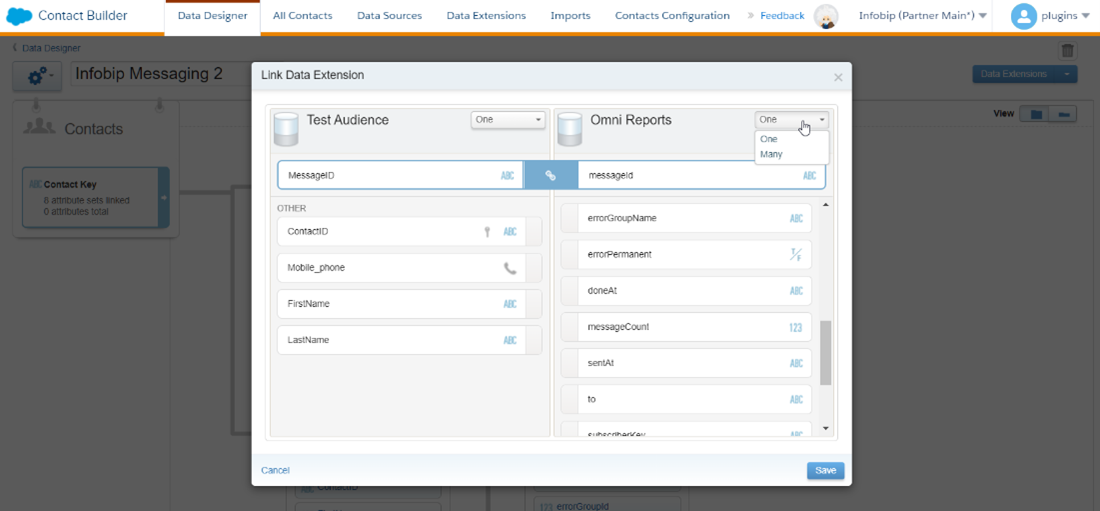
- Click Add Relationship next to your Journey Audience data extension.

- Find the data extension for SMS and Omni message reports in the Webhooks folder.
- After the data extension is loaded, click the MessageID field in Journey Audience and connect it with the same field in the reports data extension.
- Once these are connected, use the drop-down to set the relationship to one-to-one.
How to Create a Journey Using Infobip Channels
This section gives an example of how to create a journey that includes an SMS, Viber, or Kakao message.
To get started:
- Log into Salesforce Marketing Cloud and go to Journey Builder.
- Create the new journey.
- Select to build a multi-step journey with Data Extension entry point.
- Select the data extension that was created for this journey.
IMPORTANT: If you want to create a decision split based on message delivery, use the Audience data extension that is part of the Infobip Messaging attribute group.
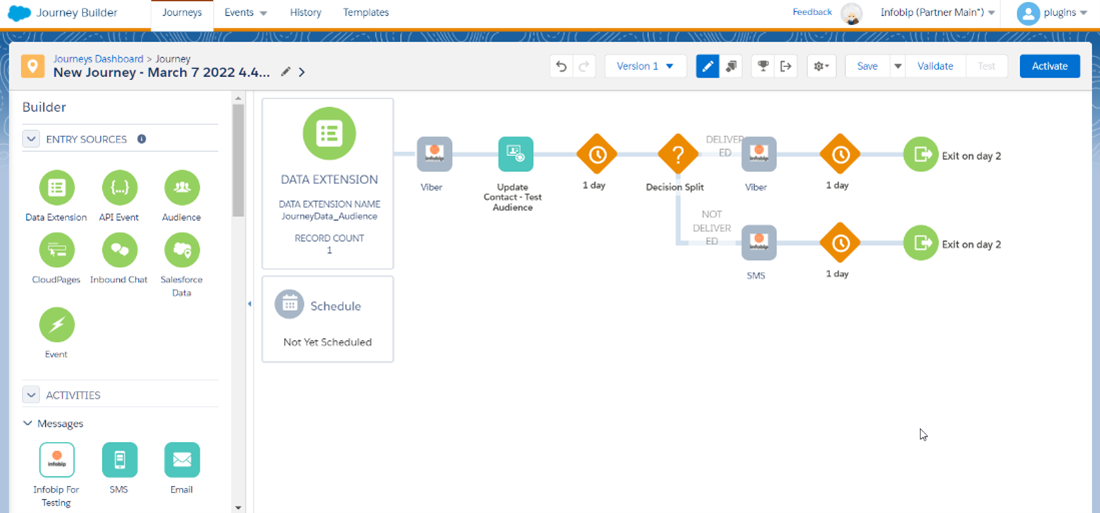
Include a message in a journey
- Select Infobip Custom Activity and enter the following information:
- Infobip API key
- Base URL from Infobip
- Notification URL that was generated after you created the Webhook code resources
- Select the communication channel (SMS, Viber or Kakao) and click Next.
After you select the channel you want to use, you will see a form for specifying the message. Read the following sections for information about each channel.
IMPORTANT: Be sure to define Data Extension before configuring Infobip Message element. Including Data Extension after already defined Infobip Message element causes issues with the Journey like not being able to pull records from DE when messages are being sent.
SMS
Set up the message according to the form and click Next. For SMS you can add a link to the message for URL tracking. When an end user clicks the link, a report will be sent to the SMS URL Tracking data extension. You can send a test message if you want to, but note that the journey must be activated and you cannot use placeholders in test messages.
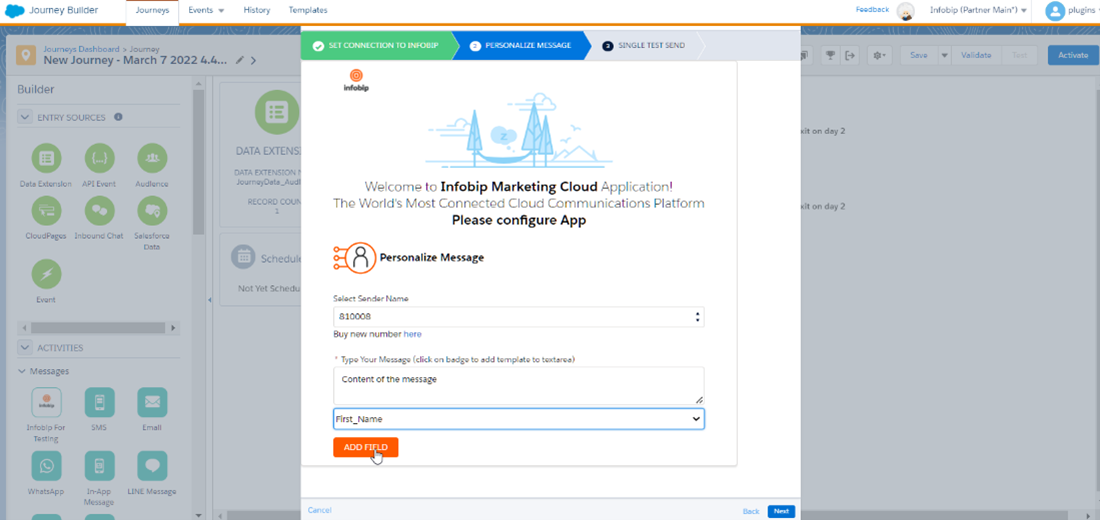
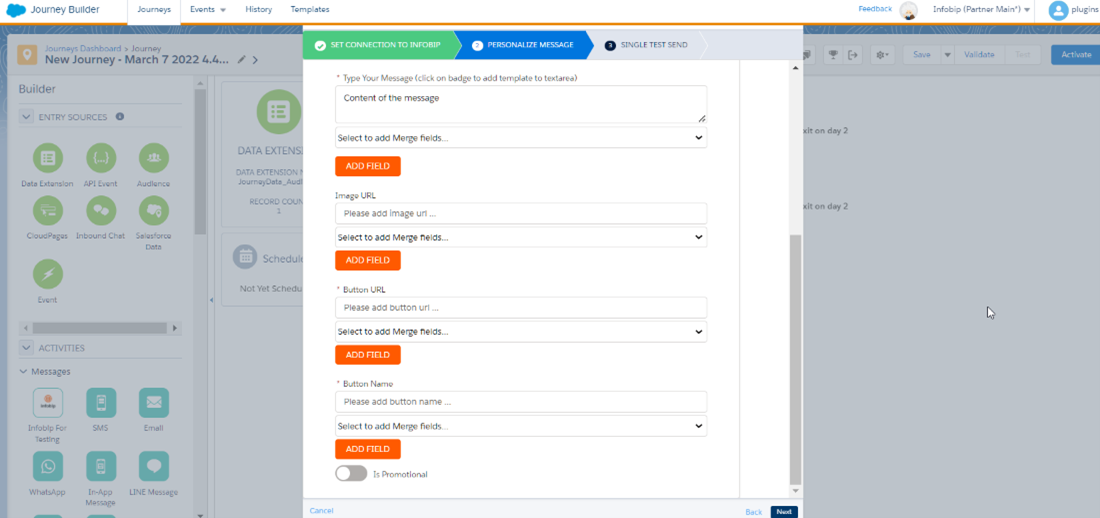
Viber
In addition to supporting text, you can include an image URL, a button name, and a button URL in a Viber message. You can also personalize these elements.
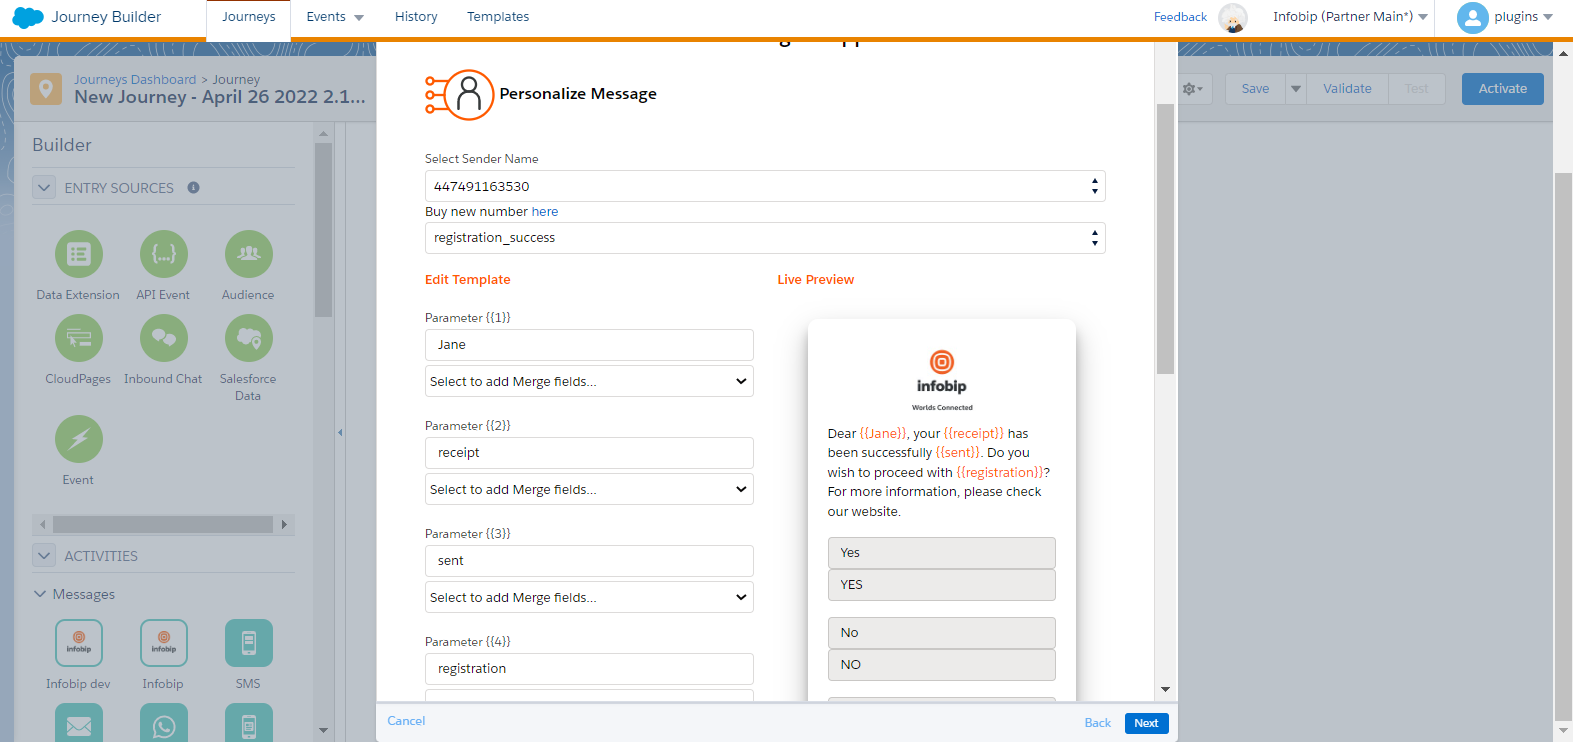
With WhatsApp you can send a templated message from Marketing Cloud directly to your customers. Supported templates are:
- Text Templates
- Media Templates
Check more about supported templates here.
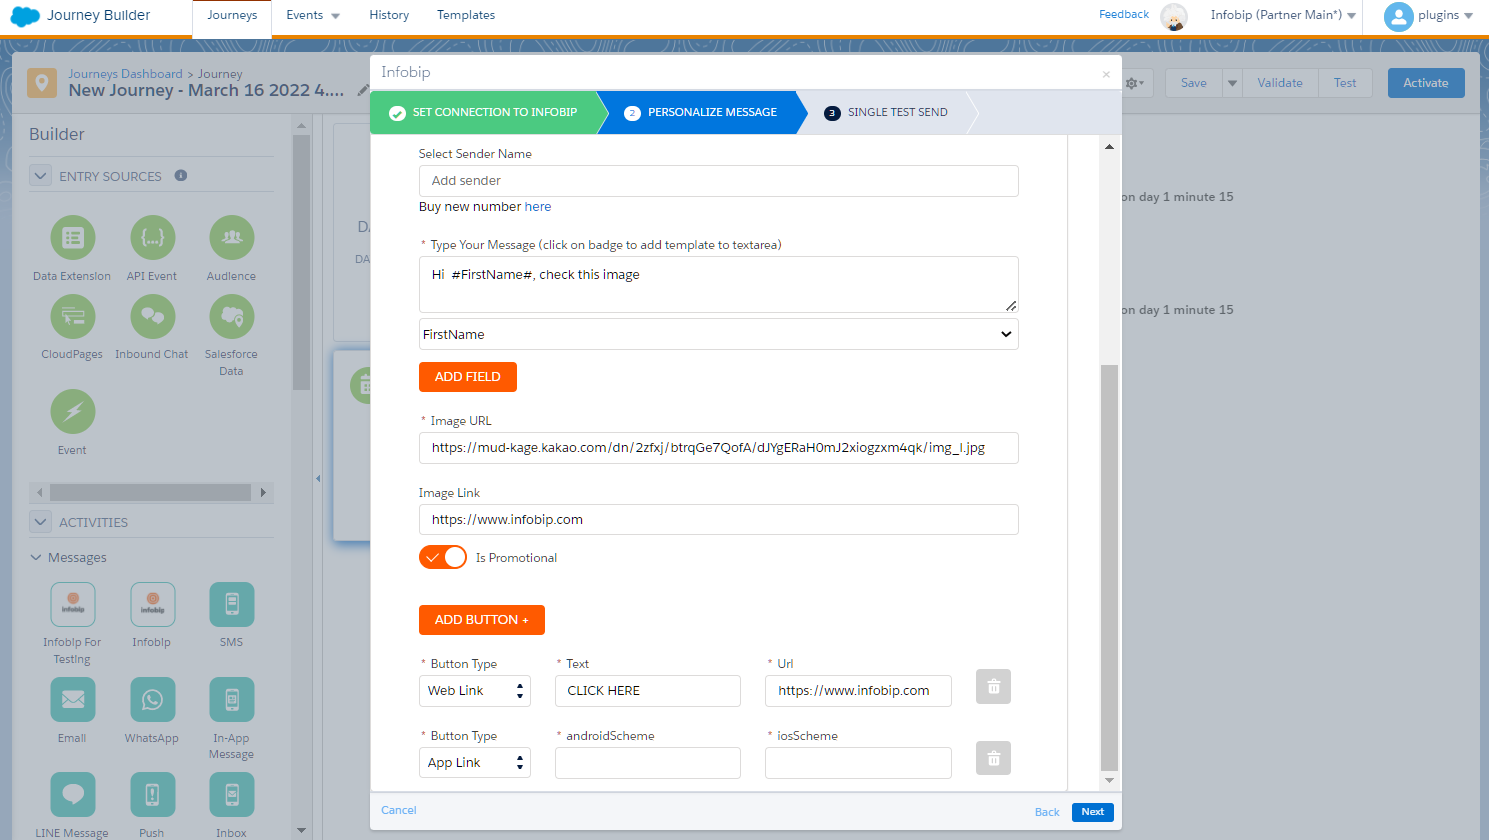
KakaoChinguTalk
This channel lets you include these elements in a message:
- Text
- Image URL
- Image link
- Up to 5 buttons (supported types are web link and app link)
Complete the journey setup
After you add the Infobip Message element, then add Update Contact Activity to the journey. This is available under Activities > Customer updates.
You also need to update the data extension field called messageId with this value: {{Interaction.REST-1.messageData}}. This value is automatically created once the message has been sent and will get its own messageId.
IMPORTANT: REST-1 is key of Message1 from the journey, so the next message will be REST-2, and so on.
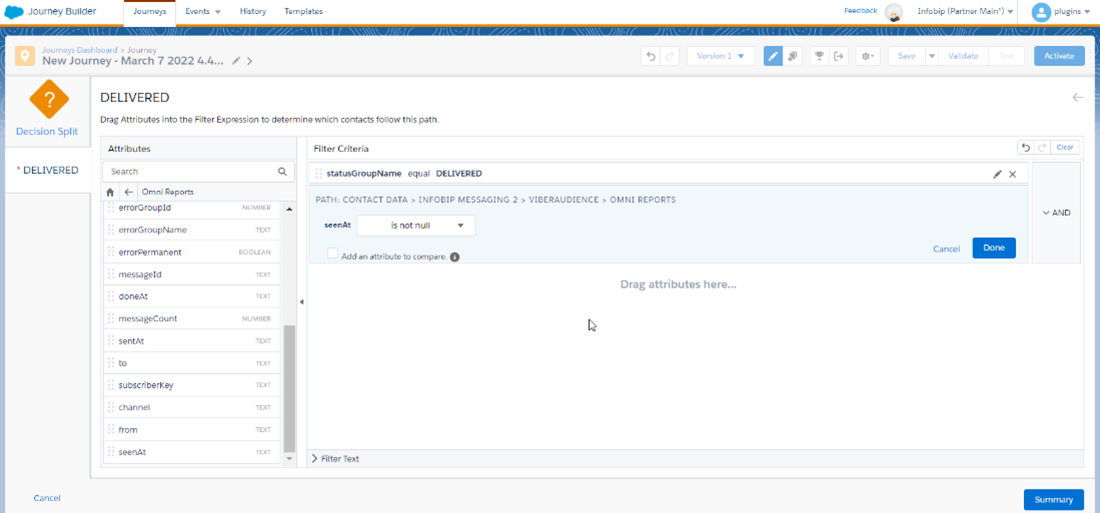
Set up a decision split
After you set up the activity for saving messageId, you can define a decision split in the flow:
- Click Edit.
- Under Attributes click Contact Data.
- Click Infobip Messaging attribute group > Audience that is defined as the entry point in the journey.
- Under Audience you should find the message report data extension.
- Click the reports data extension for the message you sent:
- For SMS select SMS Delivery Reports to check message delivery, or SMS Url tracking to check URL clicks.
- For Viber or Kakao select Omni reports.
Set up contact info for the journey
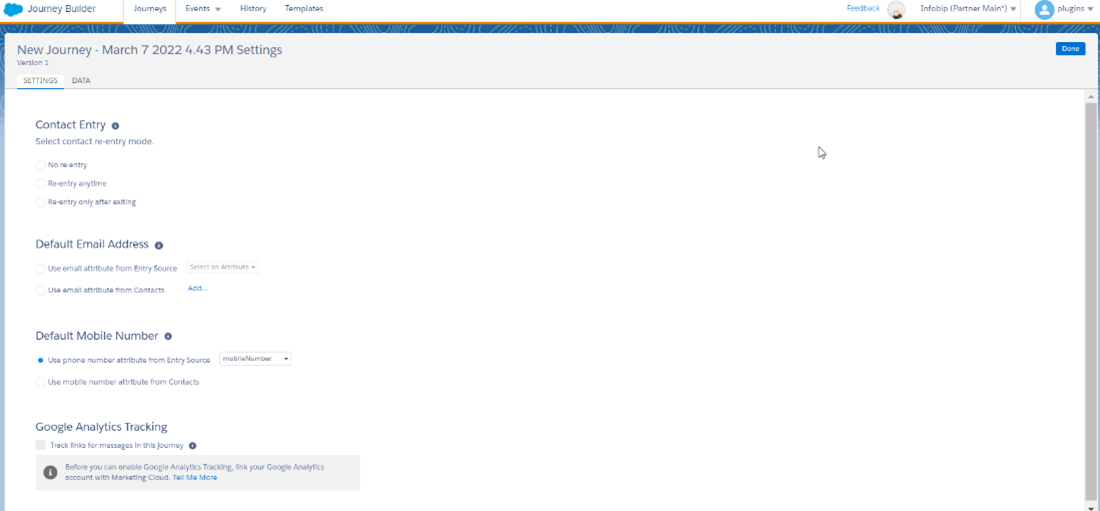
After you finish setting up the journey, you need to select a Contact Entry to use. You will want to map the default mobile number to the data type, Phone, in your data extension. This is available from the drop-down.
For descriptions of the possible message statuses, see our Response Status and Error Code documentation. For URL clicks in SMS messages, you can check if notificationType is CLICKED. To see if a Viber message was viewed, check whether the seenAt value in the Omni message report is not null.